Conversions: Difference between revisions
No edit summary |
No edit summary |
||
| Line 2: | Line 2: | ||
<translate> | <translate> | ||
<!--T:1--> | <!--T:1--> | ||
If you want to check conversions with our help, ask your manager to activate the '''Conversions''' option on your integration. | |||
<!--T:2--> | <!--T:2--> | ||
= | = General workflow = | ||
At the hit, you run our script and pass it the unique identifier of the hit in the <code>cnvId</code> parameter. We check the visitor and write the verification results to the database. | |||
<!--T:3--> | <!--T:3--> | ||
After the conversion has occurred, you send us a postback with the same unique identifier. With its help, we combine conversion and hit's verification and display the result in statistics. | |||
<!--T:4--> | <!--T:4--> | ||
= | = Implementation JS Check-type integration = | ||
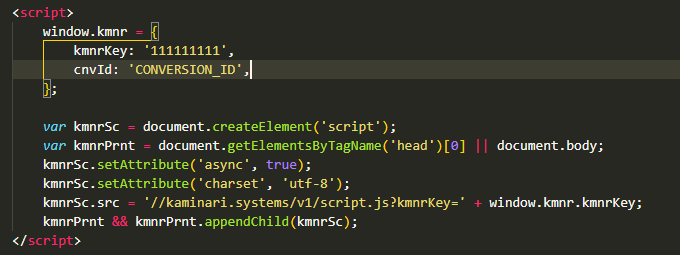
Add the <code>cnvId</code> key to <code>window.kmnr</code> with any unique identifier convenient for you. | |||
<!--T:5--> | <!--T:5--> | ||
| Line 19: | Line 19: | ||
<!--T:6--> | <!--T:6--> | ||
= | = Implementation Meta Redirect-type integration = | ||
Add the <code>cnvId</code> parameter into URL. | |||
<!--T:7--> | <!--T:7--> | ||
| Line 26: | Line 26: | ||
<!--T:8--> | <!--T:8--> | ||
= | = Postback = | ||
For any type of integration after conversion, send us a postback to the URL <code>https://kaminari.click/v1/conversion</code> with the following parameters: | |||
<!--T:9--> | <!--T:9--> | ||
| Line 55: | Line 55: | ||
| sub7 || ... || optional | | sub7 || ... || optional | ||
|- | |- | ||
| status || | | status || Conversion status, possible values are: <code>approved</code>, <code>reject</code>, <code>hold</code>, <code>test</code> || '''required''' | ||
|- | |- | ||
| currency || | | currency || Conversion currency (<code>RUB</code>, <code>USD</code>, <code>EUR</code>). Complete list of possible values: [https://www.xe.com/iso4217.php ISO 4217] || optional | ||
|- | |- | ||
| payout || | | payout || Conversion payout || optional | ||
|} | |} | ||
<!--T:11--> | <!--T:11--> | ||
= | = How to view conversions in statistics = | ||
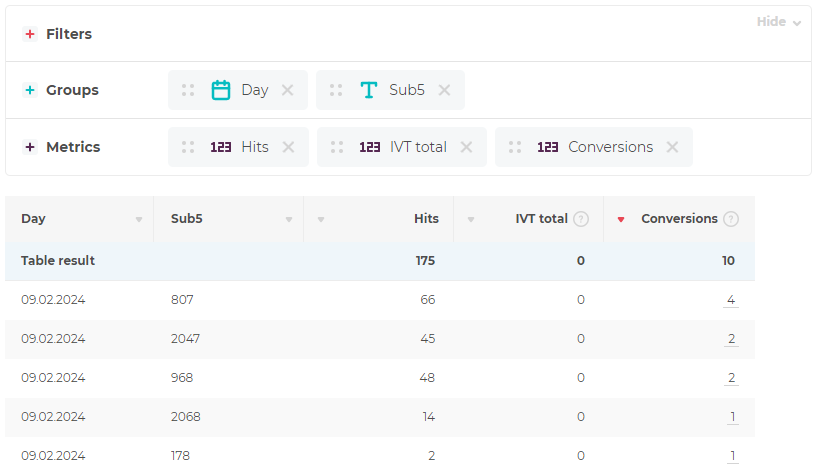
After the option is enabled and the parameter <code>cnvId</code> passing mechanism is implemented, you will see the '''Conversion''' metric in your statistics. With its help, you can see which slices converted more and which converted less. For example, we are looking at a '''Sub 5''' slice. | |||
<!--T:12--> | <!--T:12--> | ||
| Line 70: | Line 70: | ||
<!--T:13--> | <!--T:13--> | ||
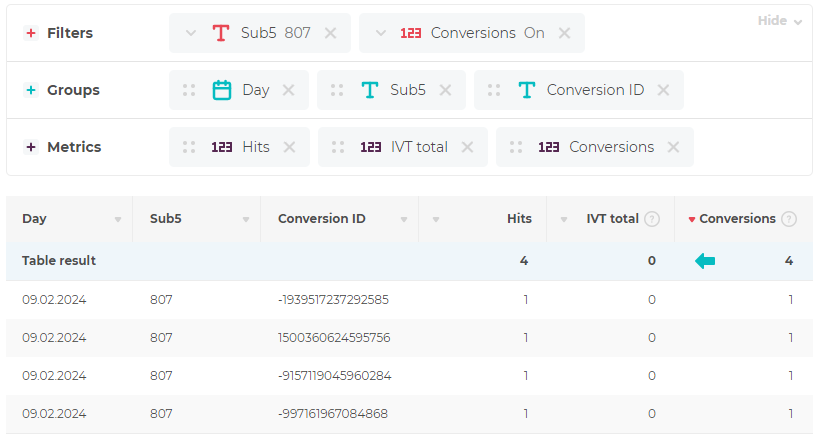
If you click on the conversion value, you will be taken to a table that will only show impressions that converted. For example, there were four conversions on the <code>Sub 5 = 807</code>, and here we can look at them in detail. | |||
<!--T:14--> | <!--T:14--> | ||
| Line 76: | Line 76: | ||
<!--T:15--> | <!--T:15--> | ||
To exit this slice and return to the previous table, click on the arrow under the column heading '''Conversions'''. | |||
</translate> | </translate> | ||
Revision as of 12:05, 9 February 2024
If you want to check conversions with our help, ask your manager to activate the Conversions option on your integration.
General workflow
At the hit, you run our script and pass it the unique identifier of the hit in the cnvId parameter. We check the visitor and write the verification results to the database.
After the conversion has occurred, you send us a postback with the same unique identifier. With its help, we combine conversion and hit's verification and display the result in statistics.
Implementation JS Check-type integration
Add the cnvId key to window.kmnr with any unique identifier convenient for you.
Implementation Meta Redirect-type integration
Add the cnvId parameter into URL.
https://kaminari.systems/v1/click?kmnrKey=111111111&cnvId=CONVERSION_ID&u=https%3A%2F%2Fsome.url
Postback
For any type of integration after conversion, send us a postback to the URL https://kaminari.click/v1/conversion with the following parameters:
https://kaminari.click/v1/conversion?kmnrKey=111111111&cnvId=CONVERSION_ID&sub1=111&sub2=222&sub3=333&sub4=444&sub5=555&sub6=666&sub7=777&status=approved¤cy=RUB&payout=12
| Name | Value | - |
|---|---|---|
| cnvId | Unique conversion identifier convenient for you | required |
| kmnrKey | Integration identifier | required |
| sub1 | Sub-tags that were sent with the hit | optional |
| sub2 | ... | optional |
| sub3 | ... | optional |
| sub4 | ... | optional |
| sub5 | ... | optional |
| sub6 | ... | optional |
| sub7 | ... | optional |
| status | Conversion status, possible values are: approved, reject, hold, test |
required |
| currency | Conversion currency (RUB, USD, EUR). Complete list of possible values: ISO 4217 |
optional |
| payout | Conversion payout | optional |
How to view conversions in statistics
After the option is enabled and the parameter cnvId passing mechanism is implemented, you will see the Conversion metric in your statistics. With its help, you can see which slices converted more and which converted less. For example, we are looking at a Sub 5 slice.
If you click on the conversion value, you will be taken to a table that will only show impressions that converted. For example, there were four conversions on the Sub 5 = 807, and here we can look at them in detail.
To exit this slice and return to the previous table, click on the arrow under the column heading Conversions.


